Standardized Tests
– commonly used to assess hand function and tactile perception
THE JEBSEN-TAYLOR FUNCTION TEST (JHFT)
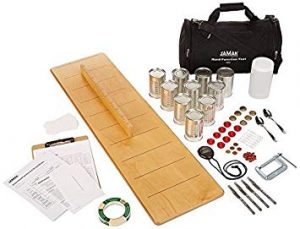

The Jebsen–Taylor Function Test was designed to provide a short, objective test of hand functions commonly used in activities of daily living (ADLs).
A range of uni-manual hand functions are assessed. The target patient population includes adults with neurological or musculoskeletal conditions involving hand dysfunction . The test was developed to be used by healthcare professionals working in restoration of hand function.
The JHFT consists of 7 items that measure: (a) fine motor skills; (b) weighted functional tasks; and (c) non-weighted functional tasks
Administration guidelines specify that testing begin with the non-dominant hand. The results are measured objectively using a stopwatch.
What the test evaluates
Fine and Gross motor hand function using simulated activities of daily living.
What the test does not evaluate
Stereognosis – the ability to recognize and identify common objects through tactile manipulation without the use of visual cues. As the JHFT does not occlude vision, stereognosis is not evaluated in this test. In fact, the room in which the test is administered, is meant to be well lit.
THE SEMMES-WEINSTEIN MONOFILAMENT TEST/EXAMINATION (SWME)
The SWME is used to evaluate cutaneous sensation levels throughout the body. Helps to diagnose nerve compression syndromes, peripheral neuropathy, thermal injuries, and postoperative nerve repair.

In 1960, psychologists Florence Semmes and Sidney Weinstein developed a set of nylon monofilaments to measure sensory loss in the hand of patients with brain injury. The SWME has since become a widely used sensory assessment tool. The monofilaments are used to map out sensory loss, and can be used to measure both diminishing and returning sensations.
The intended use of the SWME
Nerve conduction studies are the validated methods for diagnosing peripheral neuropathy, but they are costly and time consuming and require trained physicians and technicians. In comparison, the monofilament testing is an inexpensive, easy-to-use, quick, and portable test that can be used to assess the loss of protective sensation, and it is recommended by several practice guidelines to detect peripheral neuropathy. Timely identification of loss of protective sensation is important as it allows for preventive intervention. It is the initial step in identifying the first signs of a peripheral neuropathy. Although the results from SWME are not sufficient to make a definitive diagnosis of a peripheral neuropathy, it may be useful in identifying nerve dysfunction in the peripheral sensory fibres.
Examples of when using the SWME is indicated
Carpal Tunnel Syndrome, Diabetic peripheral neuropathy, Vitamin and nutrient deficiency, RA, Guillian Barre Syndrome, Vasculitis, Idiopathic Neuropathy
How to use the Semmes-Weinstein Monofilament Test (SWME)
The assessment comes with instructions and coloured pencils. There are also diagrams that are colored according to sensory abilities. Made of nylon, the monofilaments are of equal length and precisely calibrated. They vary in thickness and diameter and the gradient forces range from .086gm to 448gm. The procedure in which this assessment is administered is systematic. The evaluator starts with the smallest monofilament and works upward towards the largest filament. The evaluator stops testing when the smallest monofilament being tested is perceived by the client. The monofilaments are applied to the test site perpendicularly until they bend, for about one second. Patients are instructed to say “yes” each time they sense the monofilament. If patients fail to sense the monofilament after it bends, the test site is considered to be insensate.
KEY
Normal -Green
Diminished Light Touch – Blue
Diminished Protective Sensation – Purple
Loss of Protective Sensation – Red
Untestable – Red lines
Instructions for testing:


Address : 11777 San Vicente Blvd, Los Angeles, CA 90049 suite # 502
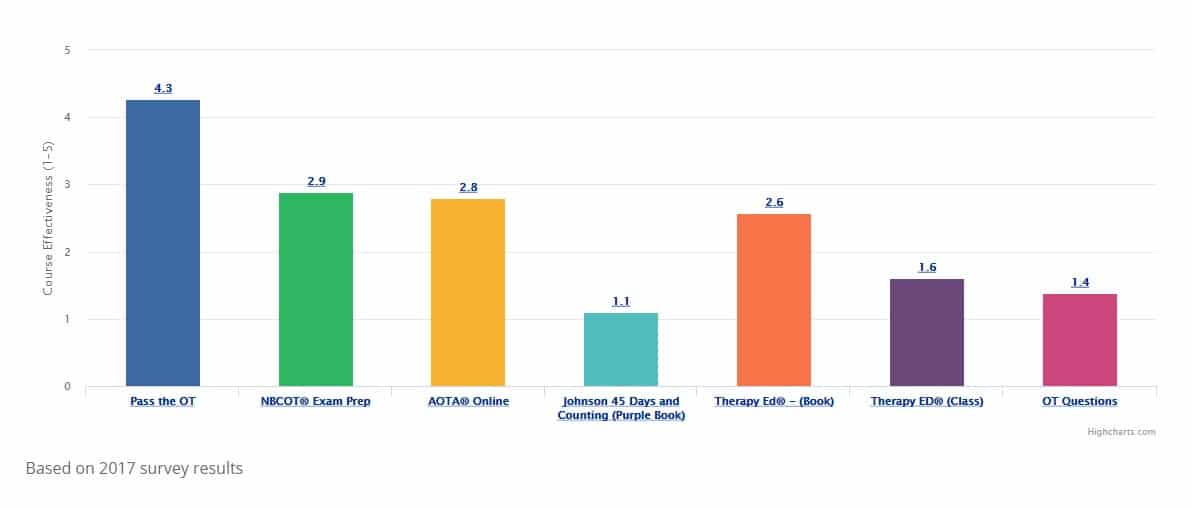
At the end of each month, Pass the OT awards $250 to one lucky user who fills out our brief exit survey.
This survey will be sent to you after you have taken the exam.
We look forward to helping you pass the near future
Begin ProgramPlease upgrade your package to view this quiz
UpgradePlease upgrade your package to view this quiz
UpgradePlease upgrade your package to view full page content
UpgradePlease upgrade your package to view full page content
UpgradeWhat is included
What is not included
What is included
What is not included