 … ………….
There are three types of burn injuries:
1. Thermal – caused by heat sources such as flame, steam, hot liquid, hot surfaces, or radiation.
2. Electrical – caused by contact with active electrical sources.
3. Chemical – caused by contact with an acidic or alkaline substance.
The severity of a burn depends on the part of the body burned, as well as the duration and intensity of exposure to the burn source. When a burn occurs, the injury is classified by severity and total body surface exposed.
Burn Severity (Degrees)
| Degree of Severity | Description | Photo |
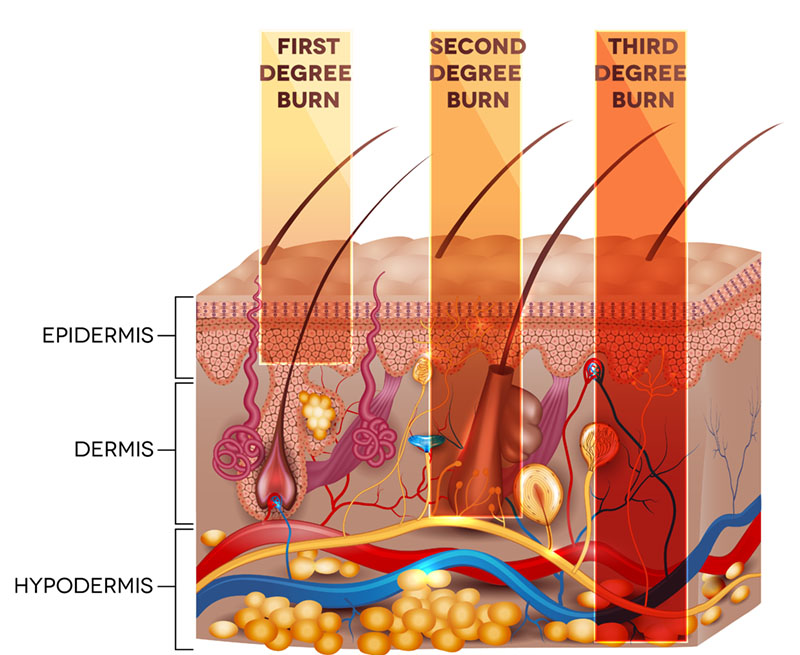
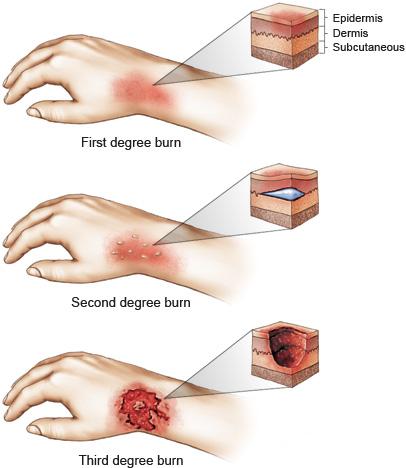
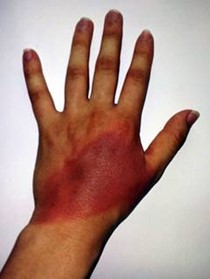
| First degree | A superficial burn that only affects the top layer of skin (epidermis). -no blistering -painful, red skin -heals in 3-4 days |
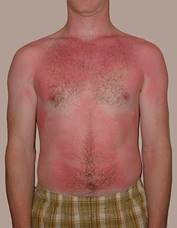 |
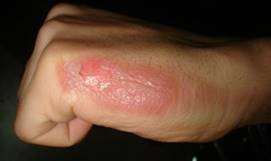
| Second degree | The burn extends below the top layer of skin (epidermis) into the layers below (dermis). -blistering -top of blisters consist of dead skin. . There are two types of second degree burns: . 1. Superficial Partial Thickness – extend through the first half of the dermis. -pink, painful, moist skin under the blisters -heal in 7-21 days -no to minimal scarring or impairment . 2. Deep Partial Thickness – extend into the second half of the dermis. -cause skin color to change, scarring -heal in 3-5 weeks -may acquire scar management |
|
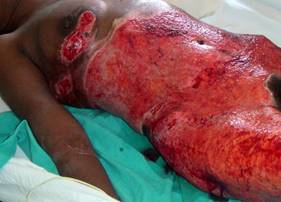
| Third Degree
* Fourth Degree |
The burn extends all the way through all layers of skin. -white, brown, black or cherry red in appearance -may or may not have blisters -require specialized treatment and possibly surgery . . . Some literature defines fourth degree burns as burns that extend into the fat tissue, muscle and bone. -Charred in appearance. -Often requires amputation of the affected limb. -Survival rate is low. |
|
| Classification Method | Description | Examples |
| Wallace Rule of Nines | Body surface area is divided into sections that comprise 9% of the surface. -accurate for people of normal weight -other percentages have been proposed for people who are obese -can only be used with adults, as children have different body proportions |
Head and neck = 9% Each upper extremity = 9% Each lower extremity = 18% Front of trunk = 18% Back of trunk = 18% Perineum = 1% |
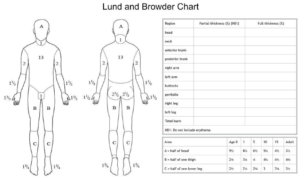
| Lund and Browder Chart | Body surface is divided into body segments. -percent of body surface affected is calculated with adjustments for age -differentiation between partial thickness burns and full thickness burns is included |
 |
| Phase | Duration | Description | Photo |
| Inflammatory Phase | From onset of burn to 3-10 days after onset. | Injury is painful, red, and warm. Edema develops. | 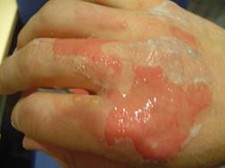 |
| Proliferation Phase | From about the 3rd day after injury until burn is healed. | Injury remains red, rigid scars may develop. -revascularization, re-epithelialization, and contraction of the injury take place. |
 |
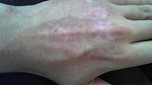
| Maturation Phase | From about the 3rd week after onset to 2+ years after onset or reconstructive surgery. | Redness fades, scars soften and flatten. -collagen remodeling occurs -tensile strength of scar increases to up to 80% of original tensile strength of skin |
 |
| Phase of Recovery | Duration | Goals of Medical Treatment | Photo |
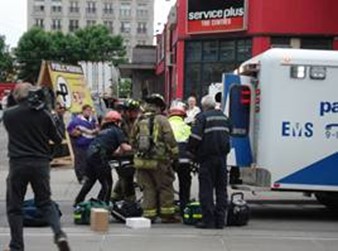
| Emergent Phase | Onset of burn to restoration of capillary function. Often occurs at the site of the injury. | -stop burn, contain and cover wound to prevent infection -prevent shock -preserve vital organ function |
 |
| Resuscitative Phase | From initiation of fluid replacement to return of capillary integrity to normal or near normal levels. | -replace fluids and end fluid shifting -prevent shock -maintain adequate circulation -maintain vital organ function |
 |
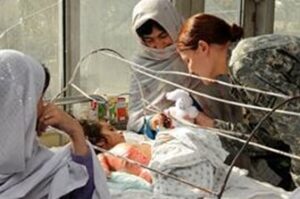
| Acute Phase | From the first 72 hours after injury until the burn wound is completely closed. | -facilitate closing of wound. May include surgery and post-operative care. -prevent infection -reduce edema -prevent loss of joint and skin mobility -prevent loss of strength and activity tolerance -provide cognitive reorientation and psychological support -promote independence during self care skills -provide patient and caregiver education |
 |
| Rehabilitative Phase | Overlaps the acute phase, begins with wound closure and ends when patient has achieved maximum function. | -scar management -prevention of contracture and deformity -improve joint mobility -restore muscle strength, coordination and activity tolerance -promote independence in self care tasks and IADLS -continued psychological support -continued patient and caregiver education with post -discharge planning |
 |
The following charts will review occupational therapy evaluation and treatment for second degree superficial partial thickness burns, second degree deep partial thickness burns, and third degree burns. Professional treatment is not usually needed for first degree burns.
Second Degree: Superficial Partial-Thickness Burns
| Area of Function | Evaluation | Treatment | Photo/Video |
| Occupational history and roles | 1. Obtain information from patient, family/caregivers, medical chart.
2. Document medical history, living situation, any social or environmental points of importance. 3. Obtain patient’s occupational history in work, self care and leisure. Document patient’s prior status and patient’s goals when therapy complete. 4. May use formal assessment tools: |
1. Develop long term goals to achieve the patient’s desired outcomes related to occupational performance. 2. Modify goals based on any potential limitations or unrealistic expectations, based on observations and family/caregiver input. |
 |
| Range of motion | 1. Informal screening or formal goniometer measurements depending on the severity of the burn. 2. Assessment of wound and developing scar tissue, especially across joints. 3. Assessment and measurement of edema. 4. If surgery was completed, evaluate range of motion 72 hours post-op. |
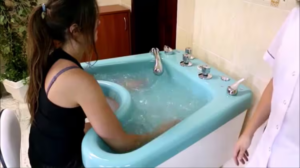
1. Edema control -elevation and positioning -coban wrap or compression garment when wound closed. 2. Wound care-sterile whirlpool -wound debridement if necessary to promote development of healthy tissue -dressing changes 3. Active and passive range of motion. Exercises as patient will tolerate. 4. Splinting to stretch and remodel scar tissue if necessary. |
 |
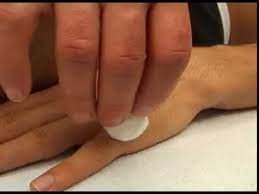
| Sensation | 1. Evaluate sensation when wound is healed.
2. Test sensation in and around affected area 3. Semmes-Weinstein monofilament test. |
1. Complete stimulation activities to affected area when wound is healed. 2. Fluidotherapy at lower temperatures if wound is on hand or lower arm. 3. Immersion in textures as patient will tolerate. -sand -rice -beans -soft textures 4. Brushing, vibration as patient will tolerate if wound is not on the hand or lower arm. 5. Massage to affected area when wound is healed. 6. Stereognosis activities if wound is on the hand. |
 |
| Strength | 1. Evaluate strength when wound is healed. 2. Manual Muscle Test 3. Dynamometer and pinch meter measurements |
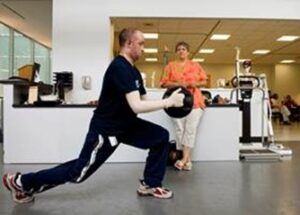
1. Introduce strengthening to treatment when wound is healed if necessary – superficial burns may not impair strength. 2. Graded strengthening exercises as patient will tolerate. |
 |
| ADLs and IADLs | 1. Observation of self care tasks if possible.
2. ADL/IADL assessment |
1. Begin ADL treatment as soon after onset of injury or surgery as possible. 2. Introduce IADLs as patient will tolerate. 3. Work and driving assessments if necessary. |
 |
| Area of Function | Evaluation | Treatment | Photo/Video |
| Occupational history and roles | 1. Obtain information from patient, family/caregivers, medical chart. 2. Document medical history, living situation, any social or environmental points of importance. 3. Obtain patient’s occupational history in work, self care and leisure. Document patient’s prior status and patient’s goals when therapy complete. 4. May use formal assessment tools: -Canadian Occupational Performance Measure. |
1. Develop long term goals to achieve the patient’s desired outcomes related to occupational performance. 2. Modify goals based on any potential limitations or unrealistic expectations, based on observations and family/caregiver input. |
 |
| Range of motion | 1. Informal screening or formal goniometer measurements depending on the severity of the burn. Measure limitations across affected joints. 2. Assessment of wound and developing scar tissue, especially across joints. 3. Assessment and measurement of edema. 4. If surgery was completed, evaluate range of motion 72 hours post-op. |
1. Edema control -elevation and positioning -coban wrap or compression garment when wound closed. 2. Wound care -sterile whirlpool -wound debridement if necessary to promote development of healthy tissue -dressing changes 3. Active and passive range of motion. Exercises as patient will tolerate 4. Splinting to stretch and remodel scar tissue |
 |
| Sensation | 1. Evaluate sensation when wound is healed.
2. Test sensation in and around affected area 3. Semmes-Weinstein monofilament test. 4. Pain scale, especially if nerve damage is present.
5. May want to assess patient’s psychological status. |
1. Complete stimulation activities to affected area when wound is healed. 2. Fluidotherapy at lower temperatures if wound is on hand or lower arm. -patients with nerve damage resulting from the burn may not tolerate fluidotherapy 3. Immersion in textures as patient will tolerate.-sand -rice -beans -soft textures -start with easy to tolerate textures and grade upward 4. Brushing, vibration as patient will tolerate if wound is not on the hand or lower arm. 5. Massage to affected area when wound is healed. 6. Stereognosis activities if wound is on the hand. |
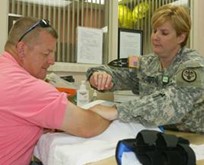
A demonstration of upper extremity sensation testing. |
| Strength | 1. Evaluate strength when wound is healed. Follow physician’s protocol if surgery was completed. 2. Manual Muscle Test 3. Dynamometer and pinch meter measurements |
1. Introduce strengthening to treatment when wound is healed. 2. Graded strengthening exercises as patient will tolerate. 3. Strength will improve slowly in relation to nerve regeneration if nerve damage is present |
 |
| ADLs and IADLs | 1. Observation of self care tasks if possible.
2. ADL/IADL assessment |
1. Begin ADL treatment as soon after onset of injury or surgery as possible. 2. Introduce IADLs as patient will tolerate. 3. Work and driving assessments if necessary. |
 |
Third degree burns often require surgery, hospitalization, or both. The following chart reviews general principles for occupational therapy evaluation and treatment for third degree burns.
| Phase | Evaluation | Positioning | Splinting | Treatment | Activities of Daily Living | Video Examples |
| Acute – rehabilitation begins 24 hours after injuries sustained | 1. Current medical history and assessment of burn -location -degree -joints crossed -type of dressing -medication -presence of inhalation injury -presence of other injuries -skin integrity and appearance -edema 2. Patient history, ADL and IADL status prior to injury. Evaluation of occupational performance and roles. -Canadian Occupational Performance Measure -Klein-Bell ADL Scale -Functional Independence Measure 3. Evaluation of current functional status -AROM -PROM -strength -sensation and pain -gross and fine motor coordination -vision -cognitive status -activity tolerance -transfers -psychological status |
Position to prevent or reduce contracture and edema -starts as soon as possible after injury -promotes lengthening of scar tissue as it forms -usually in extension as natural protective position is in flexion -may be uncomfortable for the patient -may need to encourage follow through by patient and family |
1. Maintains anti-contracture positioning -provides slow, sustained stretch 2. Facilitates lengthening of scar tissue 3. Usually custom made from low temperature thermoplastic, may include soft padding or fabric 4. Specialized splinting may be used for certain areas, such as axilla or face (reviewed in detail in subsequent chart) |
1. Passive and active range of motion – starts within 24 hours of injury
2. Edema control through positioning, compression wrapping 3. Functional movement as patient will tolerate |
Self feeding and grooming as patient will tolerate -level of participation dependent on medical management of burns and physician’s precautions -encourage participation as patient may be in pain, unwilling to move |
An occupational therapist briefly explains treatment for acute burns.
Positioning, splinting and range of motion for acute burn patients. A physical therapist explains splinting for acute burn patients. |
| Inpatient Rehabilitation
– begins when acute medical condition is stabilized -no set time frame, dependent on patient progression |
Ongoing, usually contingent on acute evaluation.
Home evaluation may be conducted prior to discharge from rehabilitation unit. |
Continued positioning to prevent or reduce contracture -more responsibility given to patient and family for follow through |
Continued splinting to lengthen scar tissue, prevent or reduce contractures -patient and family education in splint application, wearing schedule |
1. Continued passive and active range of motion
2. Edema management 3. Scar management, including scar massage, compression molds, compression garments 4. Self range of motion exercises 5.Therapeutic exercise 6.Therapeutic activities to address gross and fine motor coordination, visual motor skills 7. Patient and family education in home scar management techniques |
1. Continued self feeding, grooming and hygiene
2. Dressing and bathing as injuries and dressings will allow 3. Participation in light homemaking tasks 4. Adaptive techniques and equipment to compensate for limited function 5. Patient and family education in energy conservation, work simplification |
The importance of stretching, scar management, and compression |
| Outpatient Rehabilitation
– begins after patient discharged from inpatient rehabilitation to home |
Re-evaluation of all areas assessed during acute and inpatient phases, current functional status in home setting, current work and IADL status. -Review areas of concern identified during occupational performance evaluation. -observe IADL tasks either in clinic or at home if possible. -work and driving evaluations if applicable |
As needed depending on the status of the scar -patient and family education in positioning techniques |
Continued contracture prevention and management -adjust splints depending on contracture status -patient and family education in splint use |
1. Continued therapeutic exercise and activity
2. Home range of motion and strengthening program 3. Continued therapeutic activities to address coordination, visual motor skills |
1. Adaptive techniques and equipment to compensate for limitations in self feeding, grooming, hygiene, dressing tasks
2. Practice and adaptations for housework and home maintenance 3. Address IADL skills, including return to work, leisure skills, community mobility |
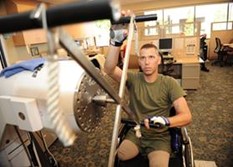
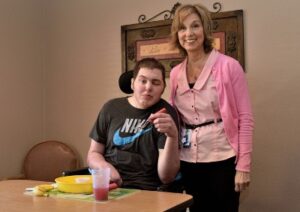
Man demonstrates adaptations to compensate for long term limitations 26 years after burn injury |
Fourth degree burns are burns that have burned through to the fat, muscle, and bone. They do not heal and repairing them is difficult. Treatment for fourth degree burns is often not required because people do not often survive fourth degree burns. The survival rate improves if the burn is on a limb that can be amputated. In this case, occupational therapy treatment would proceed in the same manner as that for amputations.
This link refers to a document with pictures and examples of positioning for various parts of the body.
| Part of the Body | Considerations | Treatment |
| Head and Neck | 1. Reconstructive surgery may be performed to restore function and improve comfort and appearance. 2. Preservation of vision, nasal and oral functions is priority. 3. Conservative management of the burn may be recommended for up to 10 days after onset, as facial wounds tend to heal rapidly due to the excellent blood supply in the region. 4. Scarring across the jaw line and down through the neck can cause flexion or extension contractures of the neck. 5. Severe facial burns may alter a person’s appearance and cause problems with social interactions during community re-entry. |
1. Positioning to stretch affected areas of lower face and neck. 2. Mouth splint to prevent contractures of the mouth and lip areas. -may need catheter balloons to stretch the cheek areas. 3. Compression garments for head and neck to remodel scar tissue. -neck splint may be indicated to provide prolonged stretch to anterior neck and lower face. 4. Facial mask once wounds are healed to remodel scar tissue. 5. Education of patient’s family, co-workers, other people in patient’s life about the healing process official burns and any changes in appearance. |
| Full upper extremity | 1. Burns across the axillary area and elbow must be managed early and aggressively to prevent contractures. 2. Arms positioned in “airplane” position to place full stretch on burned areas. -prolonged stretch important to lengthen and flatten scar tissue. 3. Third degree burns to axillary area may result in nerve damage to the arm and hand. 4. Splinting is usually indicated for severe upper extremity burns. 5. Skin integrity must be monitored when using compression wraps or garments to manage edema. |
1. Position affected UE in 90 degrees of abduction with arm fully extended – “airplane” position. 2. Manage edema through positioning, compression wrapping, compression garments. 3. Splinting to prevent contracture across affected joints. 4. AROM or AAROM if patient is alert. 5. Begin basic ADL training as soon as possible after onset. -functional use of hands during basic self care tasks key to recovery process. |
| Trunk | 1. Burns to posterior or lateral trunk may affect trunk flexion, causing limitations in lower body ADLs. 2. Trunk burns may affect axillary area similar to full UE burns. |
1. Positioning to place affected areas in prolonged stretch.
2. Compression garments and massage to remodel and flatten scar tissue. 3. Mobility and ADL training as soon as possible after onset to prevent limitations. 4. Adaptive equipment to compensate for limitations to trunk mobility if necessary. |
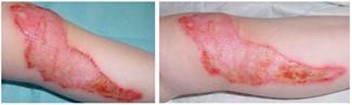
Scarring is common with burn injuries. The following chart reviews the types of scars.
| Type of Scar | Description | Treatment | Photo |
| Hypertrophic | Thick, rigid scars that are red in color and appear 6 to 8 weeks after the wound closes. Hypertrophic scars are confined to the burned area. Most second degree deep partial-thickness burns and third degree burns develop this type of scarring. | -Positioning with the scarred area in extension to stretch tissue -Topical medications and dressings -Splinting -Pressure wraps or garments -Massage when tissue has healed |
 |
| Keloid | Very thick, raised scars that extend beyond the burned area and are red or pink in color. These scars are caused by an overgrowth of scar tissue and usually start forming about 3 months after the burn onset. | -Pressure wraps and garments -Topical and injectable medications -Steroid injections -Cryotherapy -Laser treatments -Surgery |
 |
| Contracture | Scar tissue that forms near or across a joint, causing the skin to tighten and pull. This scarring can limit the range of motion in the affected joint.
Heterotopic ossification – a condition that can occur after severe burns, in which bone forms on the outside of the affected area. This can cause any joints affected to become immobile. The use of passive range of motion for heterotopic ossification has conflicting results in the research literature. Active range of motion is consistently used and supported by the research. |
-Positioning with the joint in extension -Splinting -Pressure wraps or garments -Passive and active range of motion. Treatment for heterotopic ossification – active range of motion within pain tolerance, passive range of motion according to physician’s instructions. Home active range of motion program. |
 |
This chart will review the types of contractures that may result from burns and the positioning/splinting used to prevent or minimize those contractures. Splinting prior to wound healing must be completed following physicians’ precautions to ensure the wound is not compromised. Splinting after wound healing follows guidelines to reduce scarring and contracture. It is important that splints have a close, contoured fit to help remodel scar tissue and prevent pressure areas. Splints for closed wounds often include silicone materials or silicone inserts to help reduce the effects of scarring.
| Part of Body Burned | Type of Contracture | Positioning or Splinting | Photo |
| Wrist – Volar Surface | Flexion | Splint wrist in 30 degrees of extension | 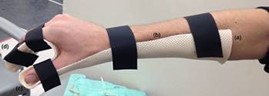 |
| Wrist – Dorsal Surface | Extension | Splint wrist in 30 degrees of extension | 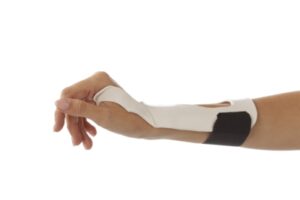 |
| Hand – Dorsal Surface or Circumference | Hyperextension of the PIP or DIP joints. | Splint with MCP joints in 50 to 70 degrees of flexion, IP joints in extension, thumb in abduction and extension | 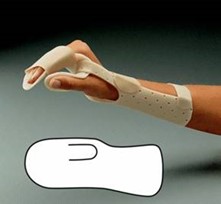 |
| Hand – Palmar Surface | Cupped hand | Splint with MCP joints in full extension, IP joints in full extension, thumb in horizontal abduction | 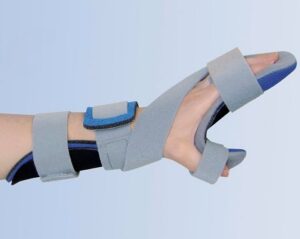 |
| Hand – Thenar Space (first web space) | Limitations in thumb opposition and abduction | C-bar splint that positions the thumb in abduction and extension | 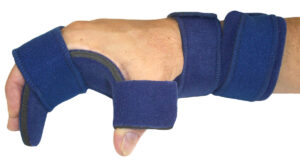 |
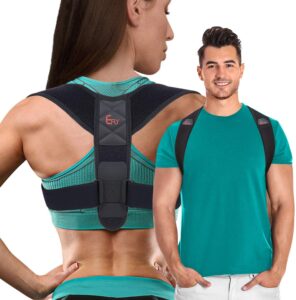
| Pectoral region | Shoulder protraction | 1. Position shoulders in abduction and external rotation. Remove pillow from bed. 2. Place a rolled towel vertically down the spine with patient in supine. 3. Clavicle strap |
 |
| Chest or abdomen | Kyphosis – upper spine flexed | Position shoulders in abduction and external rotation with shoulders retracted and trunk in extension. Bed should be flat with no pillow. | |
| Lateral Trunk | Scoliosis – spine flexed laterally | Position in supine with the arm on the affected side abducted. | |
| Hip | Internal rotation, flexion and adduction of the joint with subluxation if contracture is severe | 1. Position with hip in neutral rotation, abduction, and mild extension. Patient should be in prone or in supine with a pillow under the buttocks. 2. Hip abduction pillow as needed. |
 |
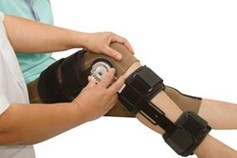
| Knee – Popliteal surface or circumferential | Flexion | 1. Conforming knee immobilizer 2. Elastomer splint 3. Foot of bed flat with no pillows under the leg. |
 |
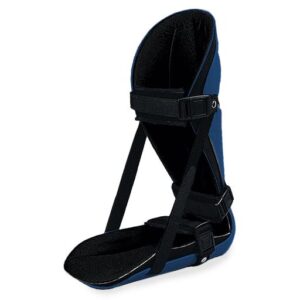
| Ankle | Plantar flexion resulting from weakness or divided tendons in dorsiflexor muscles. | 1. Splint in 90 degrees of dorsiflexion 2. Position with footboard and cushioning pillows at the foot of the bed. |
 |
Review
Address : 11777 San Vicente Blvd, Los Angeles, CA 90049 suite # 502
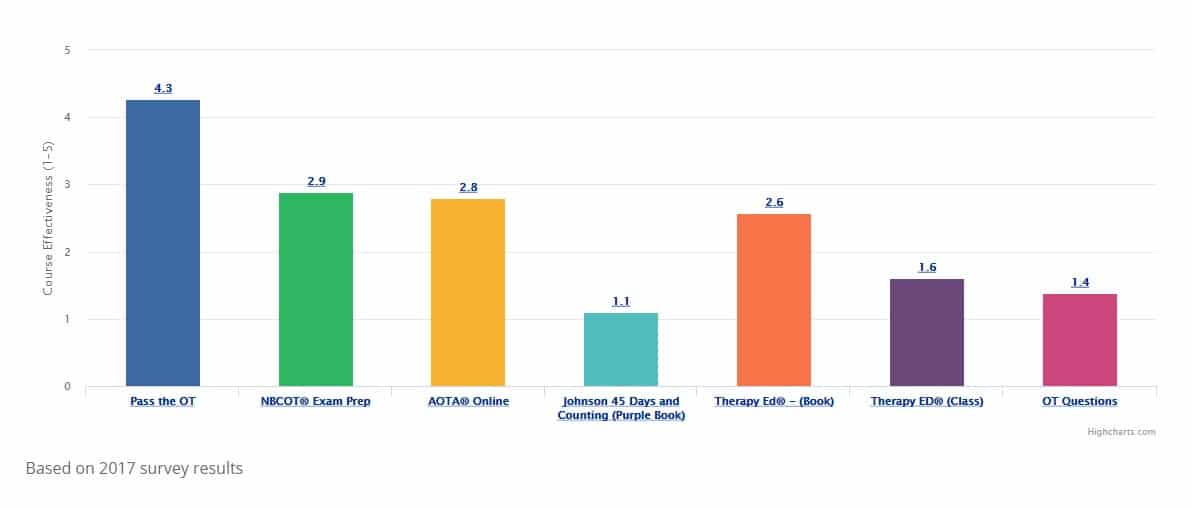
At the end of each month, Pass the OT awards $250 to one lucky user who fills out our brief exit survey.
This survey will be sent to you after you have taken the exam.
We look forward to helping you pass the near future
Begin ProgramPlease upgrade your package to view this quiz
UpgradePlease upgrade your package to view this quiz
UpgradePlease upgrade your package to view full page content
UpgradePlease upgrade your package to view full page content
UpgradeWhat is included
What is not included
What is included
What is not included