DOORS
The width of a wheelchair ranges from 21 inches to 40 inches, depending on its size and type, with the standard width being 23 to 25 inches. Since the average doorway is typically 23 to 27 inches wide, wheelchair users will have difficulty gaining access to some buildings.
Under the ADA, building owners should place at least one compliant door at each of these locations:
• Entrance to and exits from the building
• Entrances to buildings from car parks, elevated walkways, and pedestrian tunnels
• Each tenanted unit in a mall
• Interior and exterior doors, doorways, and gates on accessible routes
• Emergency escape routes
For a door to be accessible:
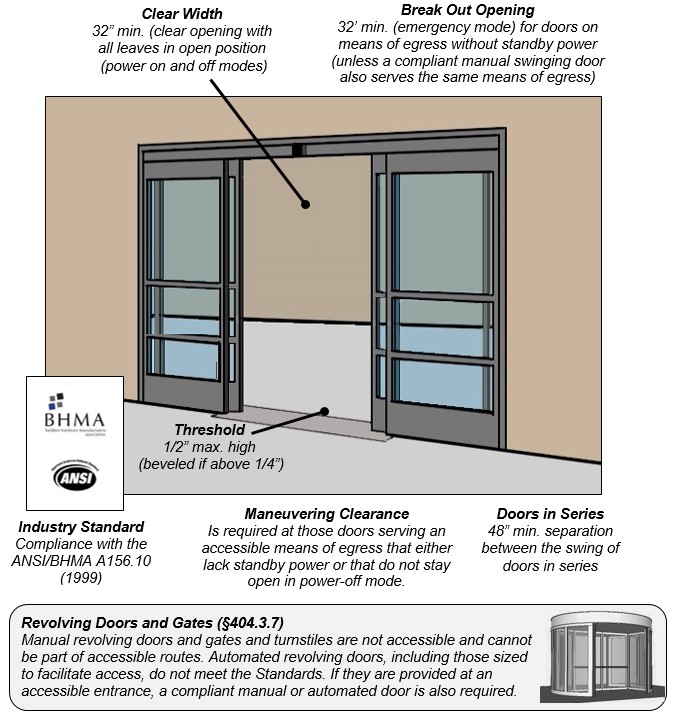
• Width of at least 32 inches, with the door open at 90 degrees.
• Height 80 inches minimum.
• The knob or handle used to open the door must be located 34 inches to 48 inches above the floor or ground.
Automatic doors provide greater accessibility for mobility-impaired persons, as they don’t require force to open them.
INSIDE THE BUILDING
DOORS
Type of Door
Hinged doors, folding doors and sliding doors may all be ADA compliant as long as they are the correct handicap door size of 32 inches and meet the following standards:
Force: Interior doors should require no more than five pounds of force to open.
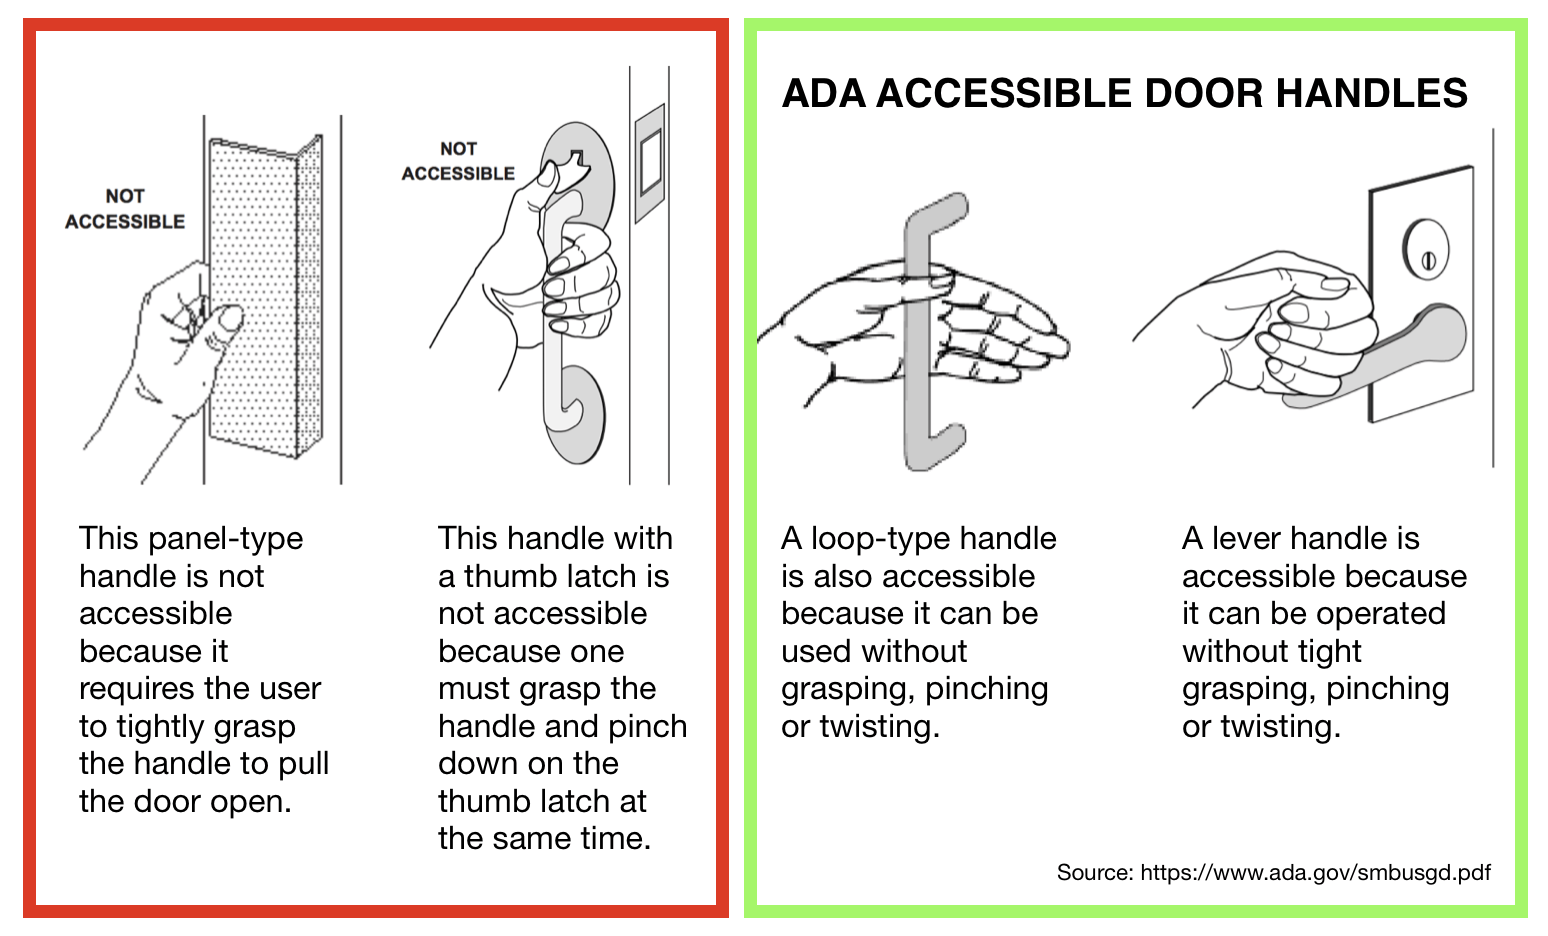
Operation: Users must be able to operate the door hardware with one hand without having to pinch the handle or twist at the wrist to open the door. Lever handles generally comply with this requirement. Round door knobs do not, as you have to twist the knob. Ensure sufficient knuckle clearance (15-inch minimum) for bar handles to facilitate gripping.
Closing: Doors that snap closed quickly make it difficult for people with disabilities – especially wheelchair users – to get through safely. Hence, doors with automatic closers should take at least 5 seconds to move from the 90-degree open position to a closed position at 12 degrees from the latch.
Maneuvering Space and Thresholds
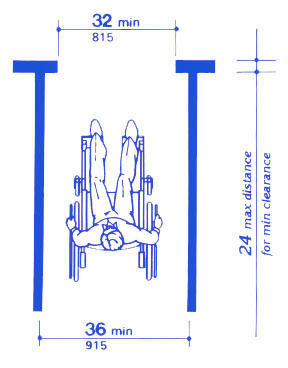
Individuals using wheelchairs or other mobility devices need space to maneuver as they approach the door, reach to open the door, maneuver through the doorway, and then close the door behind them. The amount of space varies depending on the wheelchair door width and the overall layout of the building. In general, doors that swing toward the user need a maneuvering clearance of at least 18 inches. For doors that swing away, the maneuvering clearance is 12 inches minimum. Ideally, the maneuvering space should be a level surface, which the ADA defines as a surface with a maximum slope of 1:48.

Accessible doors may not have a threshold higher than 0.5 inches, although 0.75-inch thresholds are permitted in some instances where an accessible door is being retrofitted into an existing building. Where the threshold is higher than this, the building needs a ramp.
SALES AND SERVICE COUNTERS
At counters having a cash register, a section of counter at least 36 inches long and not more than 36 inches above the floor will make the counter accessible. This provides a lowered surface where goods and services, and money can be exchanged. In addition to having a maximum height of 36 inches, all accessible sales and service counters must have a clear floor space in front of the accessible surface that permits a customer using a wheelchair to pull alongside. This space is at least 30 inches by 48 inches and may be parallel or perpendicular to the counter. It is also connected to the accessible route which connects to the accessible entrance and other areas in the business where merchandise or services are provided.
Serving Counters
Where food or drinks are served at counters and the counter height is more than 34 inches above the floor, providing a lowered section of the serving counter at least 60 inches long and no higher than 34 inches will make the counter accessible.
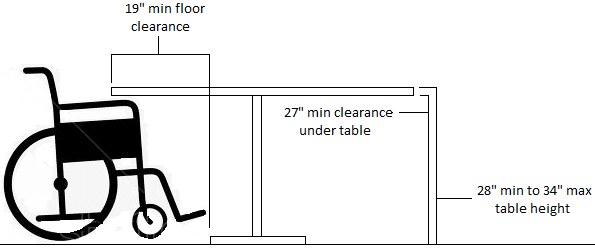
Tables
Table height: 34” maximum, 28” minimum
Knee clearance (from floor to bottom of table surface): 27” minimum
Floor clearance (from base to table edge): 19” minimum
Clear floor area: 30” wide by 48” in length

Tabletops
• 28 to 34 inches high to accommodate customers in wheelchairs.
• 30 inches of clearance is required between any of the legs on the table
• Sales counter height: 36″ maximum.
• Service counter height: 34″ maximum.
• Knee clearance: 27″ minimum (from floor to bottom of table surface).
• Clear floor area of 30″ by 48″ needed at each seating area.
• Knee clearance extends at least 19″ under the table.
RESTROOMS
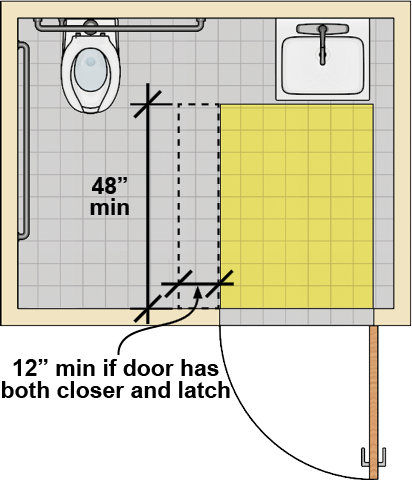
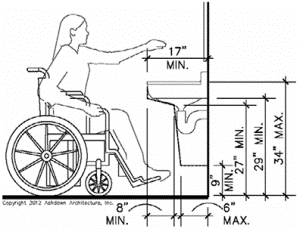
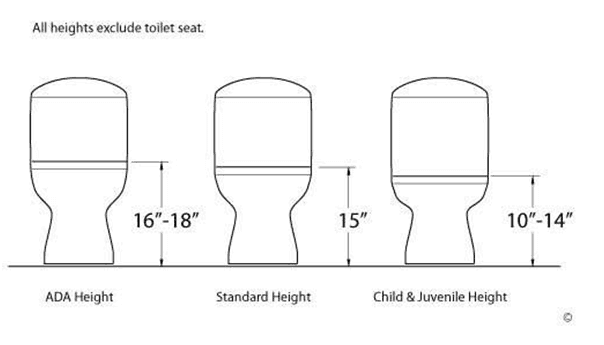
The ADA requires that a stall must have the centerline of the toilet between 16-18” from the wall to ensure that grab bars can be used.
• 30” X 48” of clear floor space is required in every restroom.
• Toilet seats must be no more than 19” above the floor.
• Sinks and countertops should be no more than 34” tall.
• Under-sink plumbing must be insulated or otherwise protected.
** In restrooms with toilet stalls, a stall 36″ wide, with grab bars on both sides of the toilet, is acceptable if there is not enough space for a larger handicapped stall.

WHEELCHAIR ACCESSIBILITY IN THE HOME
 .….
.…. 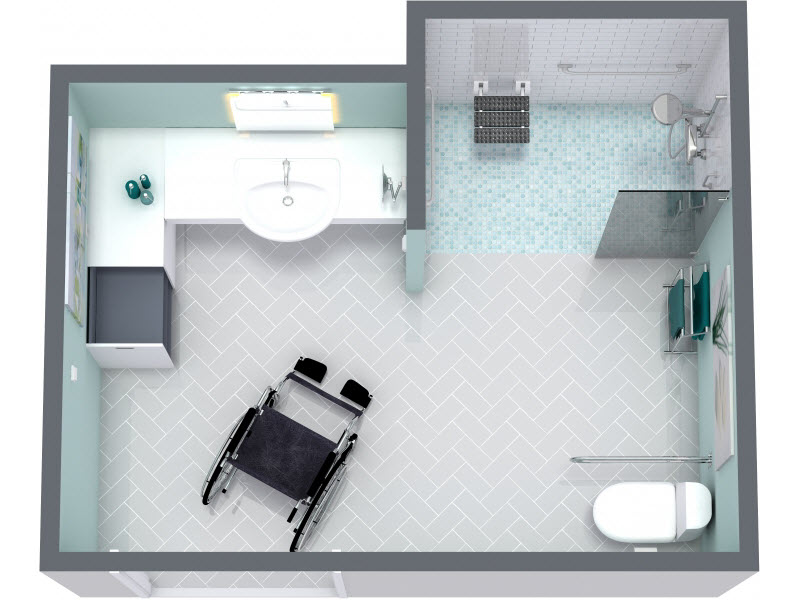
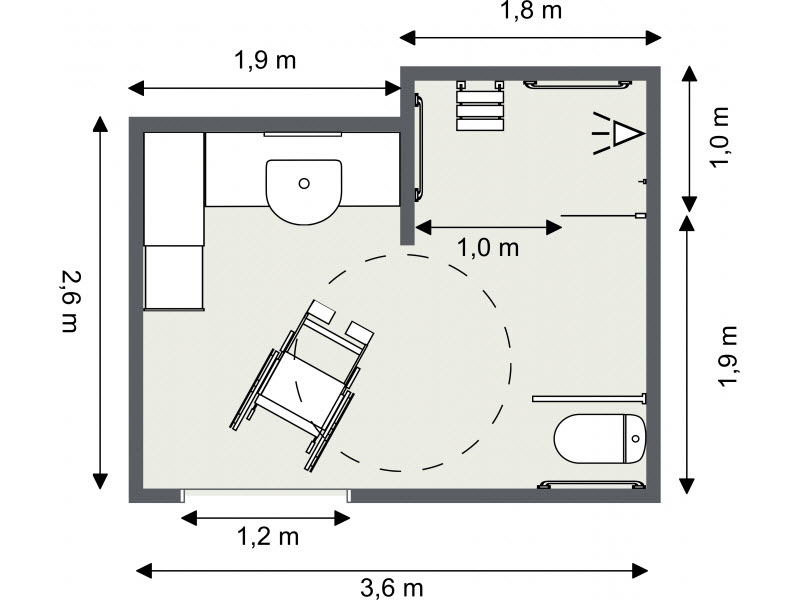
A bathroom area should allow for a turning radius of 5 feet with at least a 32″ pathway. This normally will accommodate any size wheelchair, including bariatric wheelchairs. The square footage is not necessarily the issue, but rather the clear space and accessible fixtures. One of the easiest bathrooms to use for those in wheelchairs is a wet room for the disabled, which is barrier free in all aspects of design. These designs are completely open and easy in which to maneuver, making them a particularly useful plan for residential wheelchair accessible bathrooms.
The important areas that require special specs for wheelchair modifications are:
• Shower
• Electrical
• Sink and Countertop
• Floor
• Doorways
• Toilet
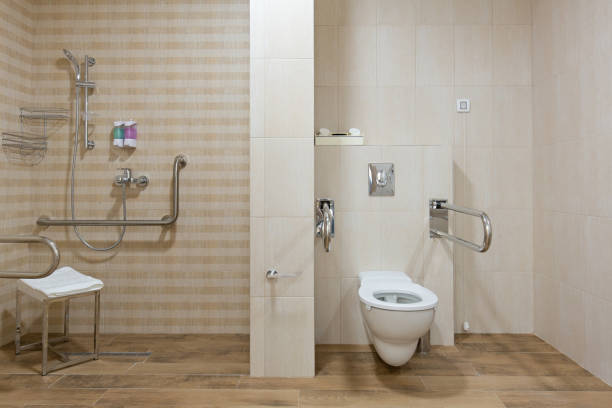
• Shower
Shower
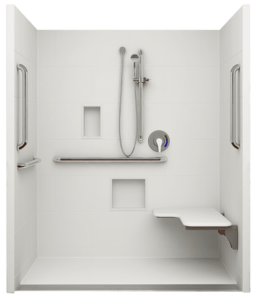
Either a tub or a shower or combo can be made accessible, but the fact is, that a stand-alone shower area is generally best for those in a wheelchair. It’s much easier in which to maneuver and is much safer than having to transfer to a tub and back again. Plus, there are additional handicapped accessories such as shower wheelchairs, if needed, which are specifically designed to be rolled directly into a barrier free disabled shower area. An additional accessory that works well for the disabled is a full body dryer that can easily be install in the shower area, for easy drying.
Tips:
• Select a handicap shower with doorless entry and without an enclosure. If adding a privacy curtain, be sure that it is secured well, so that in the event of a fall, the user can grab on to it for support.
• Make sure there is roll-in access to the shower.
• Install a sloping drain for easy and quick water drainage.
• Install a wall-mount shower seat if needed.
• Add plenty of grab bars in the shower area for additional support.
• Install a slide bar shower and hand-held showerhead.
** A slide bar shower is a thoughtfully designed adjustable compartment that allows the hand held shower head to be adjusted depending on the different heights of different individuals; it offers easy/quick solutions for households with several numbers of individuals as it allows one to shift the handheld showerhead to different heights and angles enabling anyone to take a shower at their comfort
Electrical
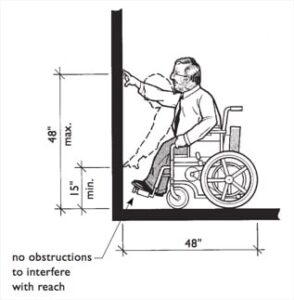
Electrical outlets should be a minimum of 18″ in height from the floor, with any countertop outlets placed no deeper than 21″ from the edge of the countertop.
Tips:
• Replace typical lights with motion-sensor or voice-activated light fixtures.
• Install a vent fan to reduce moisture and help avoid slippage.
Sink and Countertop
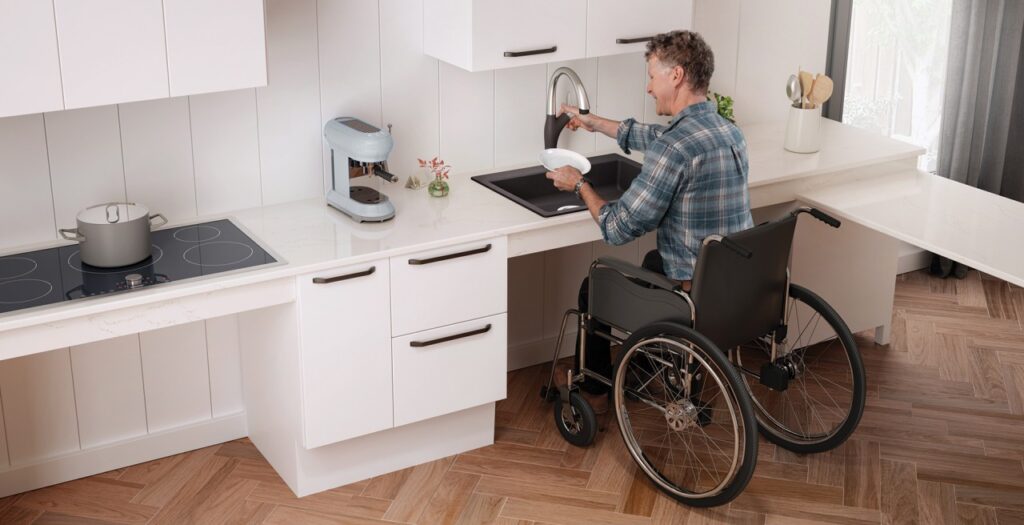
Countertops should be installed 34 to 36″ in height for those who are able to stand, and 30 to 32″ for full-time wheelchair users. Allow for a clear space underneath the countertop and handicap sink that is 29″ high x 32 to 36″ wide. You can use folding doors or install rolling cabinets to create clear space, if needed. Be sure to extend the flooring up under the countertop area, even if you’re using roll-away cabinets. Also, insulate the exposed pipes or build a protective panel to avoid possible burns from hot water pipes.
Tips:
• Install a wall-mounted wheelchair sink at 30 to 32″ height. (Make sure the drain control is easy to access from a seated position.)
• Install the sink 21″ from the front edge of the countertop to allow for easy reach. (If needed, you can mount the faucet and controls to the side of the sink for better access.
Flooring
Installing the correct flooring for a wheelchair accessible bathroom is a must, since not all materials make it easy to roll on. Other disabled bathroom flooring such as cork may be perfect for different types of disability use, however, cork is not a good solution for wheelchair access. It offers a cushioning effect and impedes smooth rolling. The best flooring coverings include vinyl, ceramic or mosaic tile. Commercial vinyl flooring is perhaps the cheapest, easiest and smoothest floor solution for wheelchair use, although many people opt for ceramic tile in a home bathroom since it is highly durable. Vinyl flooring meets general ADA bathroom requirements for safety and accessibility.
Note: The one pitfall to using ceramic tiles for flooring is that the grouted crevices can cause a rough ride and lack of overall smooth surface for maneuvering. If you use the small, mosaic tiles, the joints aren’t much of a problem because they are more narrow and create a smoother surface.
Tips:
• Vinyl or mosaic tile is generally the best for a wheelchair bathroom.
• Do not use rugs on the floor.

Doors
Conventional doorways are not always accessible for either electric power chair or manual wheelchair use, so it’s generally necessary to modify or widen the bathroom doorway. Residential disabled bathrooms should be between 32 to 36″ wide so that any size wheelchair or walker can easily move through the doorway. If you’re renovating an older bathroom, you can sometimes install a pocket door in place of your existing door and gain enough space for clearance. A pocket door is a sliding door sliding door solution whereby the door slides into a cavity wall. i.e., When fully open, the door disappears into a compartment in the adjacent wall.
Tips:
• Gain more clearance space by installing swing-clear hinges in place of standard hinges on conventional doors, so that they swing outward rather than inward.
Toilet
It’s imperative to provide the proper wheelchair accessible modifications to the toilet area and to make provision for a wheelchair commode. Make sure that the toilet is the correct height, which should be between 17 and 18″ high.
Tips:
• Sometimes it is possible to simply provide a raised toilet seat instead of having to install a whole new toilet.
• Install a wall-hung toilet. A wall-hung toilet is the fixture of choice for many wheelchair bathrooms because they can be attached at the required height and they allow clearance space for a wheelchair approach and transfer.
• Install a personal hygiene system. To help promote as much independence as possible for those who are particularly immobile, a personal system such as a bidet can be very helpful. An electric bidet or a modern version of the same, called a paperless toilet, can be installed to provide excellent hygiene for the disabled.
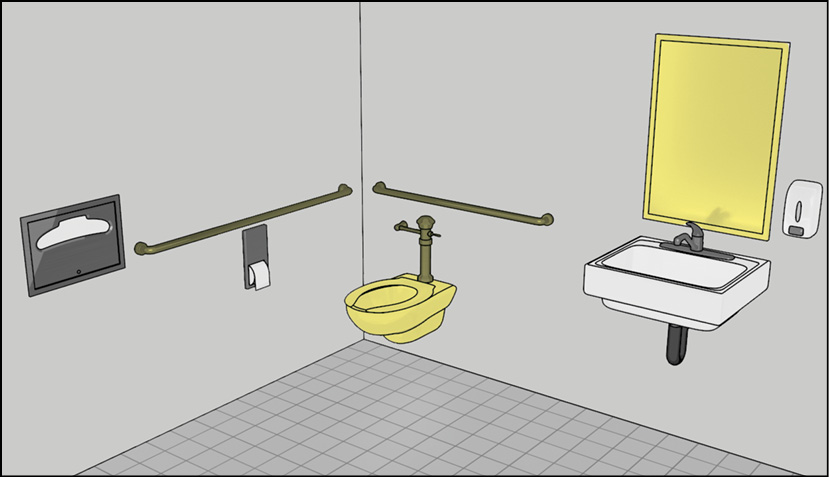
Grab Bars
One of the most important bathroom safety accessories that is necessary in every handicap bathroom, is the right safety grab bars that make it easy for a person to maneuver safely around the bathroom. Quality safety bars are made from metal that is durable and each type bar is
structured to fit particular areas of the bathroom like the toilet, sink or vanity, and tub or shower area. A disabled person can move about with much better ease while gaining support from safety grab bars that are aligned at the right height and areas in handicap bathrooms.
ADA bathroom requirement state that there should be at least one bar installed near a toilet, two near a shower, and three near a tub.
Resources:
https://www.access-board.gov/ada/guides/
Pedretti’s Occupational Therapy – E-Book (Occupational Therapy Skills for Physical Dysfunction).
https://www.gofoodservice.com/guides/americans-with-disabilities-act-ada-regulations-guide
https://www.ada.gov/regs2010/2010ADAStandards/2010ADAstandards.htm
https://www.ada.gov/reachingout/salesservice.html
https://simplifiedsafety.com/blog/when-does-my-facility-need-to-be-ada-compliant/
https://www.thebalancesmb.com/ada-ramp-construction-844440#citation-1
https://smallbusiness.chron.com/ada-door-regulations-42318.html